Comfort Sweaters

Now that the cooler weather has hit Sydney, I’ve rediscovered the comfort of the loose sweater. An understated day look with 3 easy pieces - sweater/pleated skirt/boots. The sweater works just as well with straight jeans or pants.

IMG_6858.jpg
IMG_6868.jpg
IMG_6883.jpg
IMG_6874.jpg
IMG_6861.jpg
IMG_6875.jpg

The secret - less is more!

Enjoy your creative life, Jules

You might like to take a look at these other wardrobe posts?

The Big Chill

Skirting The Issue

Back To Basics - The Jacket

Let Them Eat Cake!

Don’t you just love happy news?

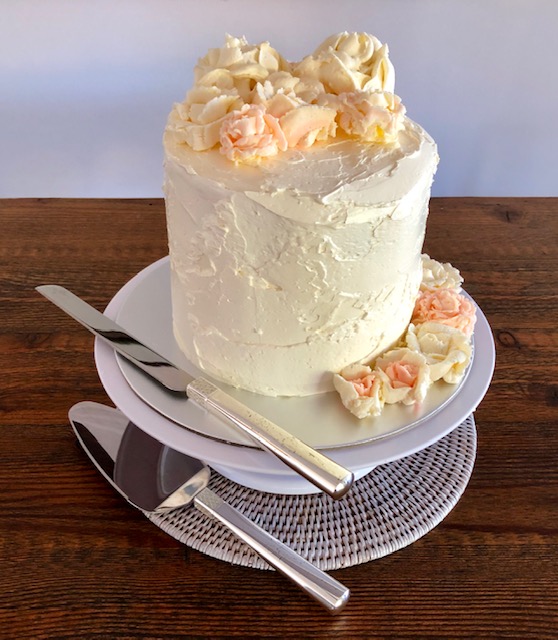
When my gorgeous step daughter announced her engagement recently, it provided the perfect opportunity to make her a cake to celebrate. Using the Lemon and Elderflower wedding cake made for Harry and Meghan as my inspiration, I went to on a bit of a research mission and found everything I needed on YouTube.

Seriously lots of fun!

IMG_6683.jpg

Here’s how it all came together. Divide your cake mixture into three, 19cm or 7 1/2 inch tins.

IMG_6646.jpg

Brush each cake layer with your Lemon and Elderflower Syrup then spread the White Chocolate Swiss Meringue Buttercream and Lemon Curd between each cake layer. I used satay sticks to hold my cake in place.

IMG_6670.jpg

Apply a layer of the Swiss Meringue to form what’s called a, Crumb Coat. This will stop cake crumbs from mixing in with the final buttercream layer. Pop your cake in the fridge for 30 minutes to set the buttercream.

IMG_6671.jpg

Once your crumb coat is nice and firm, start by icing the top first, then the sides with the remaining buttercream mixture.

IMG_6673.jpg

The unevenness of the buttercream gives the cake a beautiful modern look. Cover loosely with cling film and place in the fridge to set.

IMG_6674.jpg

Now for the flower making. I played around with icing colours until I had the tones I wanted.

IMG_6651.jpg

Buttercream roses…..here we come!

IMG_6653.jpg

These roses were all made using a piping bag and a ‘Tear Drop’ shaped tip.

IMG_6658.jpg

Once you’ve made your roses, place them in the fridge until you want to decorate your cake.

IMG_6675.jpg

Mix up a batch of white icing to secure the flowers in place.

IMG_6684.jpg

All credit must go to The Royal Wedding Cake from Delicious Magazine and How To Make Buttercream Flowers from Preppy Kitchen. All I did was follow the instructions, and of course, help eat the cake!

Enjoy your creative life, Jules

Creative In The Kitchen - Cake Decorating

I’ve always wanted to have a go at cake decorating and thought it would be really difficult. I’m happy to report that not only is it easier than it looks, it’s a lot of fun.

Here’s the Book Cake I created for my friend Catherine Greer, to celebrate the recent launch of her novel, Love, Lie Repeat.

Here’s what it took.

IMG_6401.jpg

I used a wonderful fruit cake recipe I have to create ‘The Book”, a day before I began my adventure into cake decorating.

Click here for the recipe.

IMG_6355.jpg

Then I dived into ‘Cake Decorating 101’ by checking out a few Youtube videos and visiting a nearby cake decorating supply shop. First, the cake is covered with a layer of marzipan. Then the cake is decorated with a product called, Fondant - an icing that has a dough like quality and can be easily rolled out, cut and shaped. You can buy fondant in super markets or at a cake decorating supplier in a range of colours, or you can make your own coloured fondant.

IMG_6620.jpg

Once baked, a fruit cake has small indents all over the top and the sides. These need to be plugged with marzipan so the fondant on the top of the cake appears smooth.

IMG_6365.jpg

Equipment wise, all I needed to buy was a mat to roll the icing out on and a “smoother” (see below) to rub over the icing.

IMG_6368.jpg

Apply a layer of marzipan to your cake as the fondant needs something to stick to. Roll out your marzipan to about 1/8 of an inch thick, drape it over your cake and trim.

IMG_6371.jpg

I used white fondant to create the pages on the side of the cake. Roll out your icing, measure and cut to size.

IMG_6373.jpg

Brush warm jam over the marzipan before applying any fondant. This is all part of making your icing stick. Once the white fondant was in place, I used a fork to scratch lines into the icing, giving the illusion of the pages.

IMG_6374.jpg

To make specific fondant colours, add your colouring to white fondant and knead like dough until the colour is worked through the icing. Wrap up any left over fondant and store in a cool dry place. It will keep for about 2 months.

IMG_6390.jpg

The charcoal grey colour I needed for the book cover was made by adding small amounts of black fondant to the white fondant and kneading the fondant until I had the colour I wanted.

IMG_6380.jpg

My book cake coming to life.

IMG_6382.jpg

I enlarge a copy of the cover, then cut out the letters to use as a stencil.

IMG_6384.jpg

Okay, by this stage in the procedure the wine is flowing in the kitchen and I’m singing along with Aretha Franklin.

To make the rose, a stiffening powder was added to the pale pink fondant. I rolled out the fondant and cut petal shapes, twisting them into a 3D form and setting them aside to harden. Water acts like a glue when it’s brushed on fondant. When the petals were firm I brushed the base of each petal with a little water and played around with the shape until I’d made a rose. I must confess, my first couple of attempts ended up in the bin!

IMG_6394.jpg

The finishing touch involved sticking the printed text onto the book. Da-Dar!

IMG_6395.jpg

The best part was knocking on Catherine’s door and surprising her with the cake!

IMG_6409.jpg

Here are a few Youtube videos that really helped me. Have fun!

Fondant Basics

How To Cover A Square Cake With Fondant

Making A Book Cake

Enjoy your creative life, Jules

Back To Basics - The Perfect Pants

A great pair of pants is the ultimate wardrobe extender. Worn with a Tee-shirt, a jacket or oversized sweater, one pants style can give you 3 totally different looks. Go on, try it! Play around with what you already have hanging in your wardrobe.

There are 3 basic design elements to a pants design.

  • Waist Position - above, on the waist, below waist

  • Length - full length, ankle, 3/4, cropped

  • Cut - skinny, straight, flared, wide, bootleg

Combine these 3 elements with,

  • Fabric Type

  • Colour

  • Print or Pattern

  • Embellishments and Trims

and your choice of pants styles becomes endless.

One of the most common wardrobe mistakes is buying the same style of pants over and over again without exploring other option that could extend your wardrobe profile.

Could you do with a pair of 3/4 straight leg pants? How about wide leg pants? Do you always go for black pants? Jeans - why not try a totally different style?

Here are some wardrobe basics that might work for you.

Straight cropped pants.

Screen Shot 2019-03-27 at 10.17.41 AM.png

Wide 3/4 pants with hem split detail.

Screen Shot 2019-03-27 at 10.19.27 AM.png

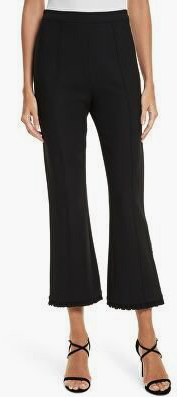
Cropped ‘Kick-Out’ pants - one of my all time favourites.

Screen Shot 2019-03-27 at 10.18.36 AM.png

Ankle length wide leg pants.

Screen Shot 2019-03-27 at 9.51.45 AM.png

And ankle length wide leg jeans. The denim pants below are essentially the same cut as the black pants above. Same cut, different fabric, giving this outfit a more casual feel.

Screen Shot 2019-03-27 at 10.18.08 AM.png

Long, straight leg classic cut pants.

Screen Shot 2019-03-27 at 9.53.11 AM.png

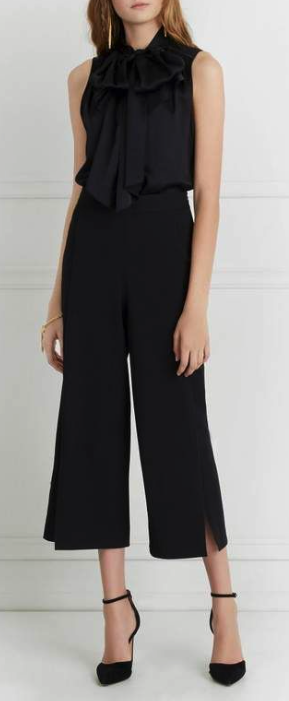
Wide, full length pants.
Screen Shot 2019-03-27 at 9.55.30 AM.png

Cargo Pants. Looks great with a sneaker, pump or slight heel.
Screen Shot 2019-03-27 at 10.01.25 AM.png

The straight leg active pants. A great style for long haul flights.

Screen Shot 2019-03-27 at 9.56.57 AM.png

Bootleg cut in denim.

Screen Shot 2019-03-27 at 10.13.32 AM.png

And bootleg cut in a blast of red.

Screen Shot 2019-03-27 at 10.14.32 AM.png

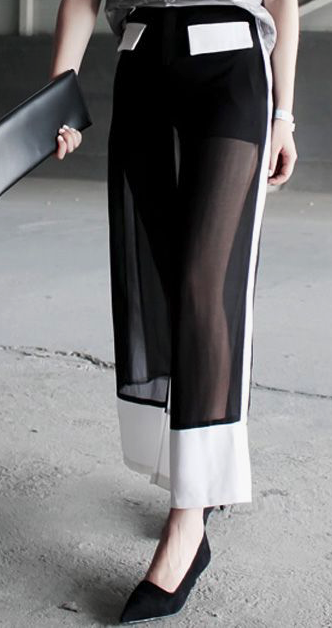
Every wardrobe can use at least one pair of ‘Statement Pants’ like below. The cut and colour combination is classic while the sheer fabric adds the glamour. I feel a party coming on!

Screen Shot 2019-03-27 at 9.55.02 AM.png

Enjoy your creative life, Jules

Back To Basics - The Little Black Dress

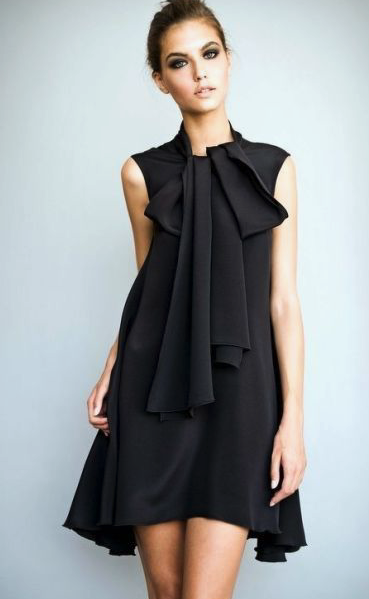
The Little Black Dress is in a league all of it’s own. It provides the ultimate canvas for the wearer to express their individuality - as an evening dress or during the day. Here are a few of my favourite looks!

The cut of these 3 dresses draws the eye to the face, neck and back.

Screen Shot 2019-03-21 at 2.44.40 PM.png
Screen Shot 2019-03-21 at 2.48.58 PM.png
Screen Shot 2019-03-21 at 2.52.10 PM.png

During the day, give your Little Black Dress a bit of a twist by adding a jacket, cardigan, a statement bag or a shoe with a difference.

Screen Shot 2019-03-21 at 3.41.11 PM.png
Screen Shot 2019-03-21 at 3.39.23 PM.png
Screen Shot 2019-03-21 at 2.49.50 PM.png
Screen Shot 2019-03-21 at 2.59.49 PM.png
Screen Shot 2019-03-21 at 2.47.41 PM.png

And if a totally black dress feels too intense, look for a style where the black is softened through a touch of colour or texture.

Screen Shot 2019-03-21 at 3.30.48 PM.png

If this length is too short for you, lessen the bare leg look by adding tights and boots in winter or wear it as a top over 3/4 pants.

Screen Shot 2019-03-21 at 3.00.59 PM.png

Enjoy your creative life, Jules

Back To Basics - The Jacket

What does a jacket say? First and foremost, it gives the wearer an air of authority and takes the viewers eye to the top of the body. A jacket provides protection against the elements - those suddenly cooler temperatures and air-conditioning. And a jacket gives the wearer a “finished” look, no matter how casual the outfit.

Here are 6 basic jacket styles that work all year round, season after season.

  • Denim

  • Leather

  • Tailored

  • Classic With Colour

  • Short Trench

  • The Statement Piece

The Denim Jacket - the ultimate casual look.

Screen Shot 2019-03-07 at 1.45.10 PM.png
Screen Shot 2019-03-07 at 2.15.52 PM.png

The Biker Jacket in classic black or burgundy. Leather of Faux - take your pick.

Screen Shot 2019-03-07 at 1.47.08 PM.png
Screen Shot 2019-03-07 at 2.17.22 PM.png

You’ll get plenty of use from a Tailored Jacket if you don’t let it get too serious. Add jeans, cropped pants and some jewellery to keep the fashion dialogue fun!

Screen Shot 2019-03-07 at 1.59.14 PM.png
Screen Shot 2019-03-07 at 2.26.07 PM.png

Wearing a Classically Tailored Jacket in a beautiful colour breaks down the formality of the garment, giving the look a more contemporary feel.

Screen Shot 2019-03-07 at 1.43.58 PM.png
Screen Shot 2019-03-07 at 2.22.27 PM.png

The Short Trench is a casual staple. Sand, Black or French Navy looks great over just about anything. Wear a trench in a Snake or Leopard Print to up the ante.

Screen Shot 2019-03-07 at 1.49.17 PM.png
Screen Shot 2019-03-07 at 2.10.42 PM.png

And finally, The Statement Jacket. Add a touch of glamour, day or night, with some Fur or Sequins.

This is one item in your wardrobe you can get a lot of fashion milage out of. I’ve found some great statement jackets over the years. In most cases, all you need is a black outfit underneath and away you go. Let the jacket do the talking. And the best accessory with this jacket? Has to be a glass of champagne, doesn’t it?

Screen Shot 2019-03-07 at 2.35.16 PM.png

Enjoy your creative life, Jules

Back To Basics - The Tee-Shirt

Lately I’ve been re-discovering my love of a few wardrobe basics. So, for the next 4 blog posts, I’m going to profile 4 basic items that I think are worth a re-visit. This week it’s the humble tee-shirt.

Our tee-shirts often languish in the depths of our wardrobe but honestly, they’re a great little “go to” item when you want to keep your outfit, simple, low-key and comfortable.

  • Cutaway sleeve

  • Sleeveless

  • Short Sleeve or long

  • High neck

  • Round neck

  • Crew Neck

  • Neutrals and Colours

  • Motifs and Words of Inspiration

The style variations are endless. Here’s a few looks I’ve been wearing lately.

IMG_6182.jpg

As basic as it gets - great on sweltering summers day.

IMG_6153[1].jpg

Find a colour you love that works with what you already have. This tee-shirt is new but the camo pants are an old favourite.

IMG_6164.jpg

Everyone needs a little merci!

IMG_6177.jpg

The ultimate classic that suits everyone. A blue and white stripe tee-shirt in a semi fitted cut.

IMG_6158[1] copy.jpg

I just had to buy this sequinned tee-shirt when I saw if - Billy’s convinced it’s him!

If you’ve been bypassing the good old tee-shirt, check out what you have in your wardrobe. Like me, you might be ready to love them again.

Enjoy your creative life, Jules

Post Card From New York!

A week in New York and it’s easy to see why it’s called, The City That Never Sleeps. From high fashion to street art, fine dining to the street carts of the Halal Guys and their middle eastern cuisine, New York is a place of contrasts and inspiration. Here’s a little of what I saw during the festive season.

It’s early morning and I’m out and about in Soho. The criss crossing streets are full of fashion, art galleries and cafes. Perfect! Nothing much opens until 11am so it’s great to walk around while the streets are still quiet.

IMG_5760.jpg

Ice skating in front of the Rockefeller Centre.

IMG_5746.jpg

The Nike store on 5th Avenue where you can customise your own sneakers.

IMG_5538.jpg

This young mans theme? Silver and white.

IMG_5509.jpg

Overlooking Central Park and the famous Dakota Apartment Building, left of the towers.

IMG_5423.jpg

The elegance of Dior.

IMG_5699.jpg

Christmas decorations are big, big, big in NYC.

IMG_5407.jpg

Japanese ramen broth in Lower Manhattan. The perfect lunch when it’s 2 degrees outside.

IMG_5684.jpg

Crossing the Brooklyn Bridge.

IMG_5636.jpg

There she is in the distance - taken from the Brooklyn Bridge.

IMG_5653.jpg

If I could have bought anything while in New York, it would have been this hologram of David Bowie at the WhiteWall Store, Soho.

IMG_5677.jpg
IMG_5673.jpg
IMG_5679.jpg

Oh, and this exquisite Elie Tahari beaded dress.

IMG_5541.jpg

This would be my broadway recommendation. In one word - outstanding.

IMG_1574.JPG

Aren’t we all?

IMG_5682.jpg

The detailed window displays at Bergdorf Goodman department store were amazing.

IMG_5581.jpg

New York is a great city to walk around. You never know what you’ll see.

IMG_5671.jpg

Happy new year everyone. Here’s to everything you want to do in 2019 and may your dreams come true.

IMG_5762%5B1%5D.jpg

Enjoy your creative life, Jules

Creating Your Own Rituals!

Is there something you like to do simply for yourself? A ritual that makes you feel good?

  • coffee at a certain table

  • wearing a specific item of clothing or jewellery

  • walking a down a street you love or past a building you admire

Each morning for the past seven years, a small bunch of frangipani and or gardenias has been placed near the steps at the beach where I walk and have coffee. It’s the ritual of a local lady who swims there each day. She picks the flowers on her way down to the water.

IMG_5029.jpg

A simply ritual that gives her pleasure - her simple yet beautiful offering to the world.

IMG_4916.jpg

As we end one year and begin another, I hope you discover a special ritual in your own life - something that brings you joy every time you do it. Have a beautiful holiday and festive season, and as always……

Enjoy your creative life! Jules xx

DYI Celebration Wreath

I love the way North Americans’ decorate their homes during the festive season. I especially love wreaths. After seeing a couple of hanging wreaths on Pinterest, I decided to make my own. And it’s easier than you think.

IMG_4950.jpg

Everything I used came from my local discount store. Sprays of holly, lengths of tree trim, assorted christmas decorations, ribbons, mini pegs and fairy lights.

IMG_4939.jpg

I made a circular frame using wire then threaded the foliage around and through the frame. A week after I made the frame, I found some wire wreaths in one of those pop-up Christmas decorations shops - so you can buy a ready-made one if you don’t want to make your own.

Drape fairy lights around the foliage several times making sure there’s enough cord to reach a powerpoint. Use thick ribbon to hang your wreath.

I have exposed beams over my table which made the hanging process easy. Otherwise, you’ll need to make sure the wreath is securely fitted to your ceiling.

IMG_4946.jpg

Cut thin ribbon different lengths and thread through the end of your decorations. Use mini pegs to secure in place.

IMG_4959.jpg

Flick the switch and your wreath will add that extra touch of sparkle to the night. Below are a couple of images from Pinterest that I use for inspiration.

Screen Shot 2018-12-06 at 8.57.55 PM.png
Screen Shot 2018-12-06 at 8.57.28 PM.png

A beautiful hanging wreath can be used as a decorative feature for any occasion - why wait for Christmas?

Enjoy your creative life, Jules